War Thunder Logitech Extreme 3d Pro Download UPDATED
War Thunder Logitech Extreme 3d Pro Download
Five outstanding artists demonstrate the tricks of their trade, explaining how to create urban, sci-fi, natural, stylised and fantasy textures.
Urban texture
Mostly, when I desire to create a substance, I showtime with a list of the materials involved and make a quick base of operations for each of them. I detect that the materials themselves aren't really as important every bit the transitions and masks used to put them together, so I spend nearly of my time working on that.
I and so break down the style they alloy into a few categories. When blending near any materials together, they volition autumn into one or more than of the following: weathering, top or environment. Each of these requires some information in order to blend the materials properly. This information could exist something like a Curvature map, Ambient Occlusion map or a Acme map. An example of each would exist: weathering – paint on metallic that is peeling or flaking off (requires curvature, ambient occlusion or world space normals); meridian – puddles in a dirt path (requires height); environment – snowfall, sun bleaching, scattered leaves from the wind or annihilation you don't run into in the model itself (requires world space normal or position).
Information technology's of import to know this because you lot desire to develop each of these maps along with your master textile. If a Height map that wasn't created along the mode is needed, in that location are two options to create the map. Ane selection is to go back to the outset of the projection and create the Peak map and add edits step-by-pace as you changed the textile. The other option is to convert the current maps, which will usually outcome in a loss of accuracy. That loss is accumulative each time the map is converted, so if yous used a Normal map to Height map, then to Ambience Apoplexy for masking clay, you will about likely go odd masking.
01. Floral designs
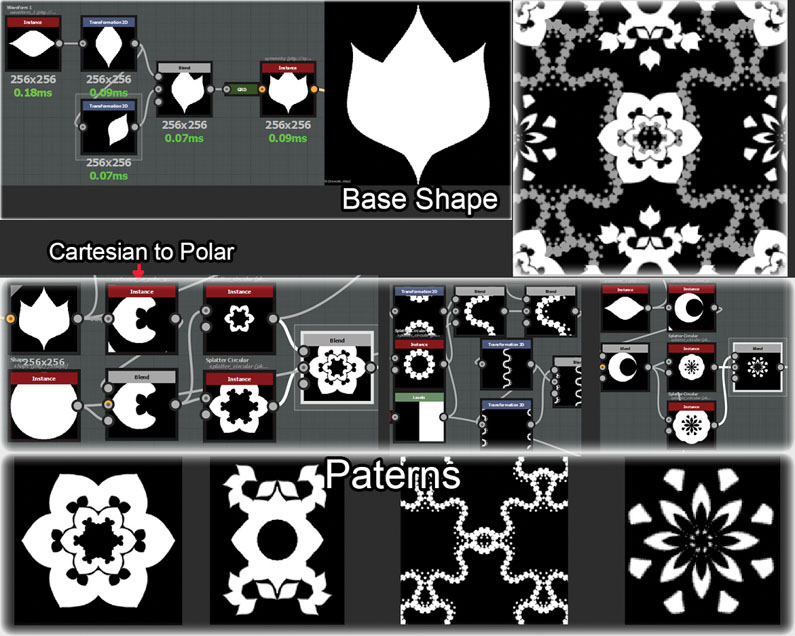
Information technology's amazing what yous can practice with a few solid base shapes. When I was creating the floral designs for the wallpaper, I regularly found myself going back to using the aforementioned base shape and but using warps, tiling, symmetry and circular splatters to make other shapes.
02. Substance does the piece of work
The plaster substance I made takes in a mask and makes the border area more damaged and broken than the rest. This makes adjustments easier as I just have to worry about blending two materials instead of 3.
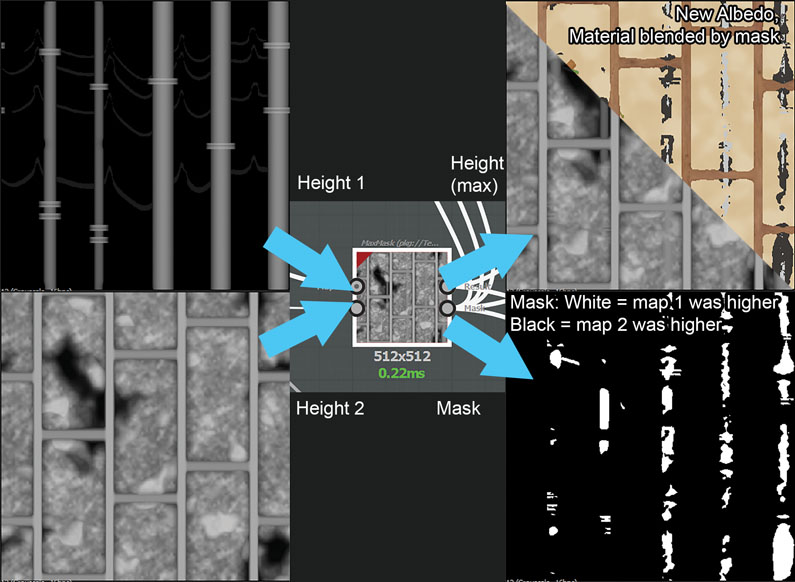
Only because in that location isn't a default for something doesn't hateful you lot tin can't practise it. I wanted to blend ii materials based on top, then I used a pixel processor to brand one.
04. Optimise early on
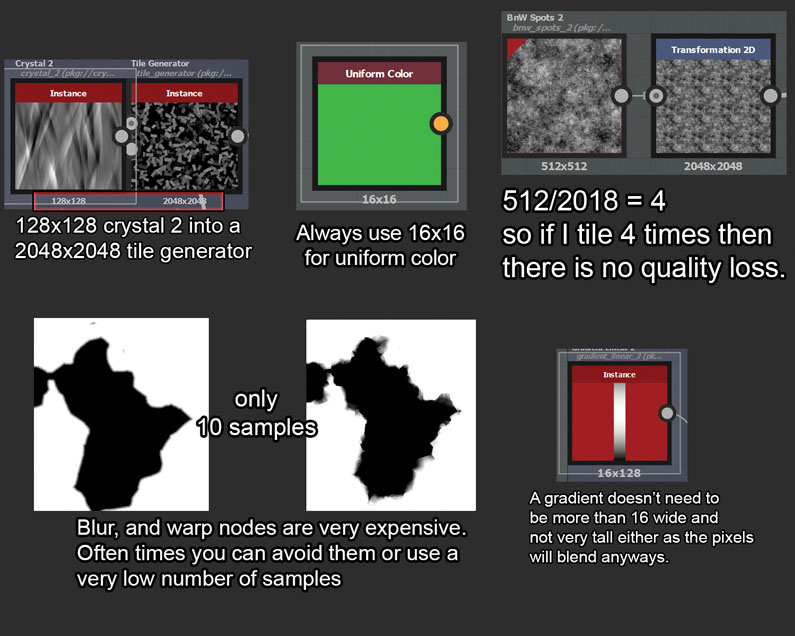
A full resolution node will make your processing much faster and can be used to get some modest mistiness into your noise for free. For my beginning draft of the wall, I took nigh 13-15 seconds each fourth dimension I fabricated a modify. After doing resolution optimisations, it dropped to 3-4 seconds.
05. Water stains
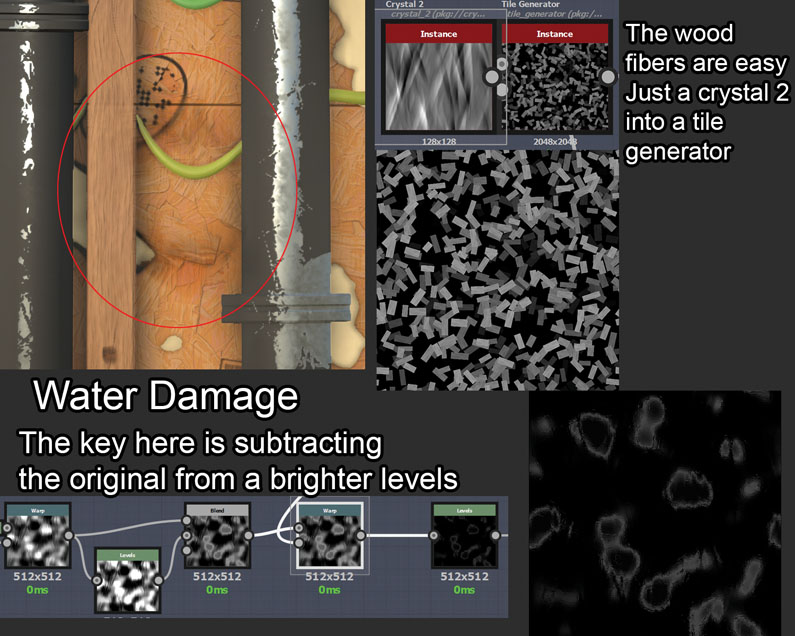
Technique by Kyle Peeters
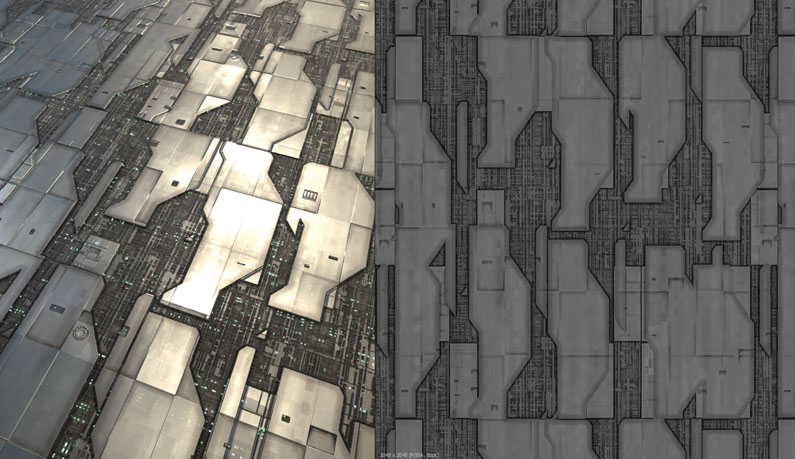
Sci-fi texture
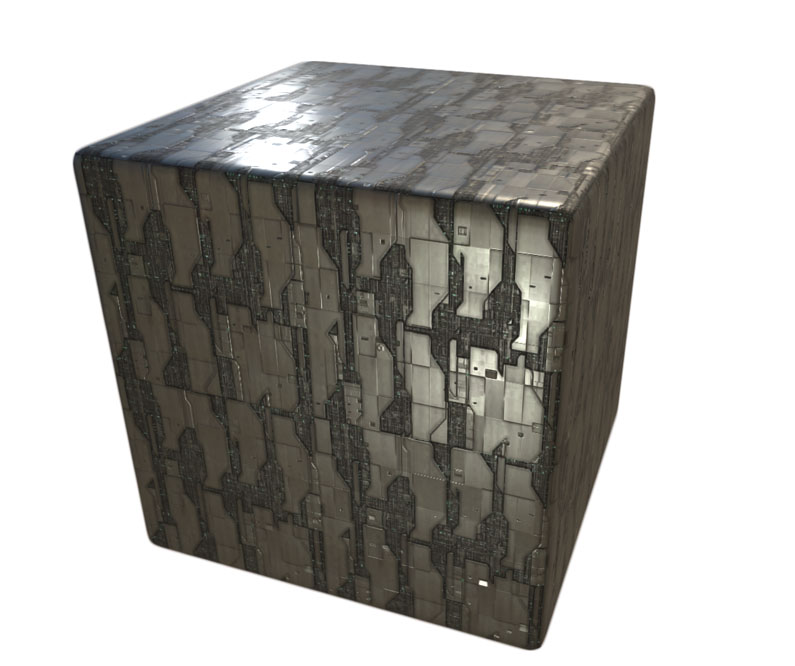
Earlier whatsoever piece of work begins, I start with my points of inspiration. This helps clarify my goal and build a framework for the artistic process that comes side by side. My inspiration for the sci-fi Textile Challenge was massive spaceships, like those in Star Wars or Warhammer 40k. Adjacent, I had to plan the whole material skeleton; this design process is like to the one many 3D artists utilise to develop complex models from scratch.
Here I tin can plan what kind of features my substance will contain and how to group them into nodes. Knowing my goal helped me to picture what the fabric should expect like in the finish. I decided on big external slabs and plates of solid metallic, small luminescent windows that would reside between the plates and fragile structures for the inner hull. Constant experimentation was very important and useful in helping me to reach this. When I find something interesting past accident I'll often brand a annotation of it, as these results might become helpful in future projects. You can't just rely on a few schemes you already know. Thankfully, Substance Designer'southward node workflow gives you infinite combination possibilities, so allow yourself the time to unleash your creativity.
This brings us to the topic of fabric flexibility, which, in my opinion, is a crucial element backside all good materials created with Substance Designer. Flexible materials are reusable, requite you and other users a wide range of possible applications, and relieve time. Moreover, creating flexible materials in Substance Designer is relatively easy to attain – and enjoyable. Exposing parameters should deliver total control of Substance to the user. Simply call back to expose only those which are most important; also many switches can brand Substance harder to control.
01. Create and blend patterns
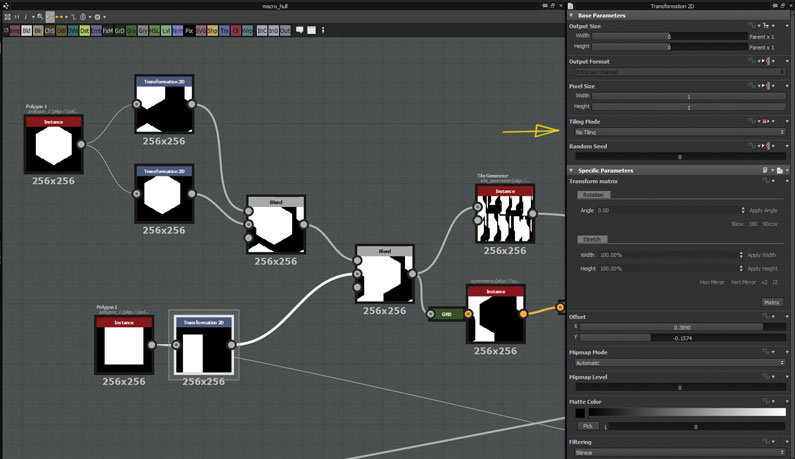
To create geometrical patterns, apply several shapes, transform them and alloy together. Disable Tiling in second Transform node – this allows you to move shapes freely. Create switches and expose their parameters to alloy patterns and customise layers of your cloth.
02. Leaks and dirt effects
The Ambient Occlusion node is useful for creating leaks and dirt on your edges. You can utilise a Slope map to blend information technology with your Diffuse map. Don't forget to add it to your roughness layers.
03. Base colour scheme
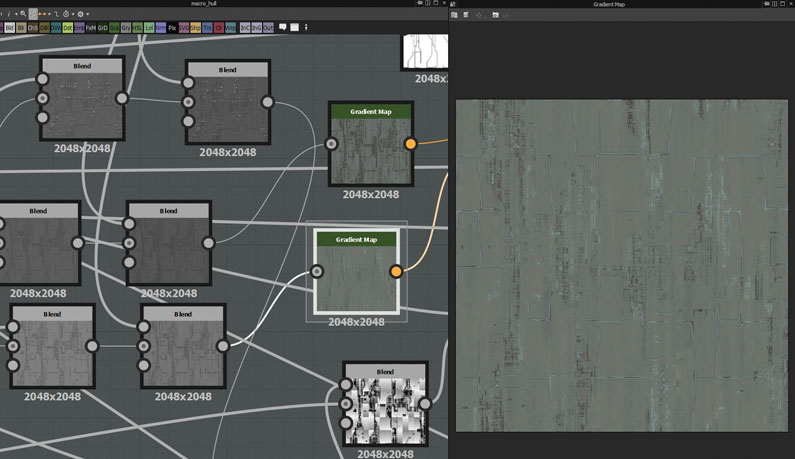
Don't blitz colour outputs; focus on creating a good grayscale first – information technology'due south used as the footing for all outputs. Apply the Gradient map on information technology to create a base colour scheme.
04. Histogram scan
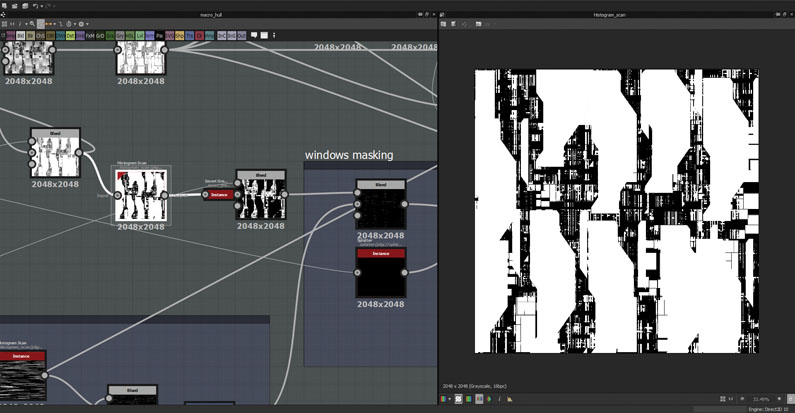
Using Histogram Scan is one of the best ways to extract a mask from a grayscale paradigm. Don't hesitate to use it – it will soon become your best friend.
Technique past Jacek Kalinowski
Nature texture
Before this contest I had only used Substance Designer for two weeks, and then I wanted to start with something simple: batching a flow animation texture via Maya and using Substance and the flowing exposed parameters.
The principle I used was based on one Transform 2nd node'south y-axis exposed parameter (that could drive the flow), one Directional Warp node with a blurred Procedural map for the menstruation distortion and one unix-based pattern for control of emissive, tiptop, normal, base of operations color and metallic map channels, enriched by procedural noises.
The dry out country and height of the lava are controllable past exposed Level nodes on the base of operations pattern. Thankfully, afterward I posted my entry for the first time, I discovered a forum topic where someone explained the '$time' system variable and how it tin can create a timeline in Substance Actor.
I applied this to my catamenia-exposed parameters every bit a multiplier and was able to make two options possible: automated and manual flowing.
With the Substance Player and $time variable I was equipped with a powerful animated outputs batcher! I could then use Maya and Arnold for shading, rendering and, finally, compositing.
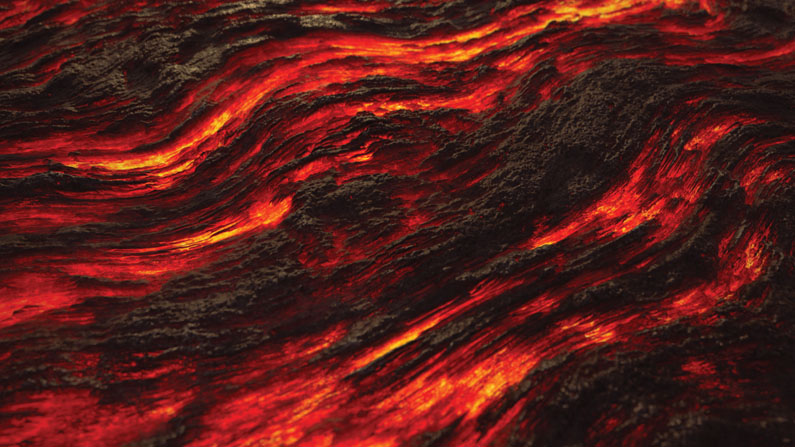
With regards to the aspect and material, it was important to me to have a real visual modify betwixt the fluid and dry lava states with an inflation during the dry (a bit like a meringue in a microwave oven) and for the flow, in order to take the awareness of stretching and filamentous lava.
It would be hard to do a linear breakup for this entry because a lot of things in this material influence others, so let's focus on some of the virtually important elements that helped me put it all together.
01. Create a flowing pattern
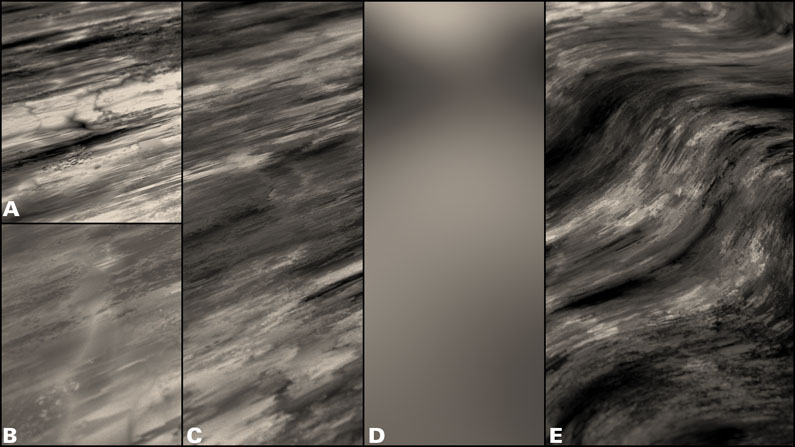
Lava based pattern (Eastward), equanimous by two Grunge maps multiplied using a Blend node (A-B=C) and distorted through a procedural Perlin noise (D).
Place a Transform 2nd node just before the distortion. Past shifting the y-centrality, you'll meet the get-go of a flowing design.
02. Stretching the lava
You can achieve your stretching and filamentous fluid lava with a multiplied second pattern that volition visually enrich the global attribute. Take a second Grunge map, add a Transform 2nd and multiply it with a Alloy node to the master pattern just before distortion. Past shifting this 'bonus' y-axis, the second pattern will slide along the main, giving the illusion of the lava stretching.
03. Use procedural textures
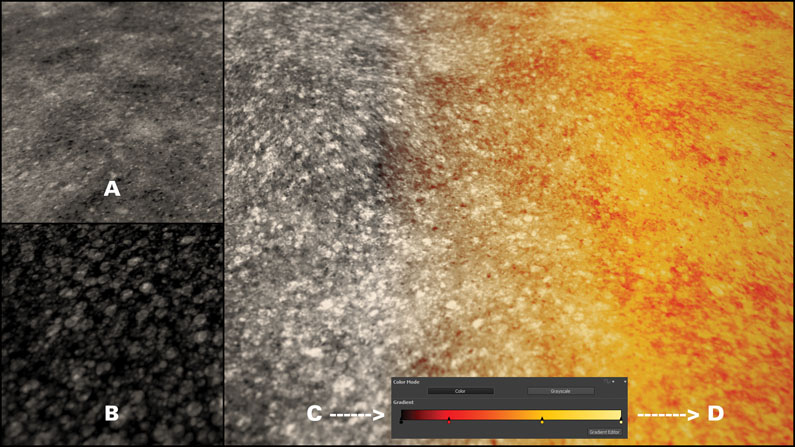
Creating lava that looks a scrap similar the dominicus surface (D) was my goal for the whole liquid land, and by using two of Substance Designer's procedural textures this job was easy. Alloy them in Add manner (A+B), distort the event with the aforementioned Perlin noise as the base blueprint (C) and colourise through a Gradient map (C>D).
04. Flowing state marks
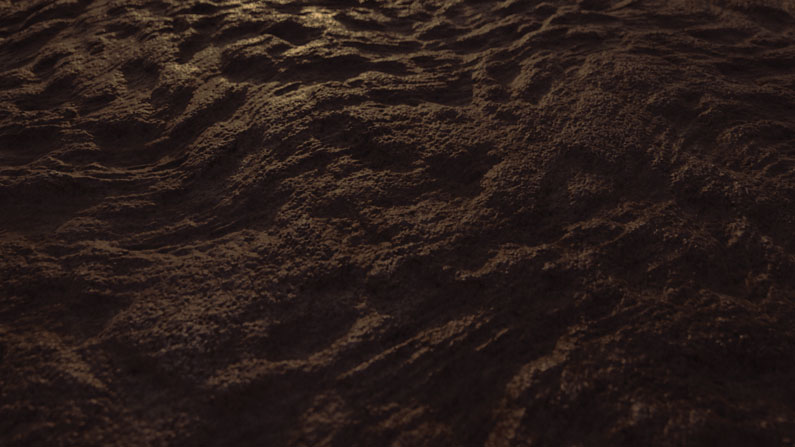
When the lava is in a dry state, keep some flowing state marks by blending the base filamentous blueprint from the beginning to the terminal Height map in Add manner. Visually, this will help you keep in mind that information technology's dry lava and not an asteroid or something else.
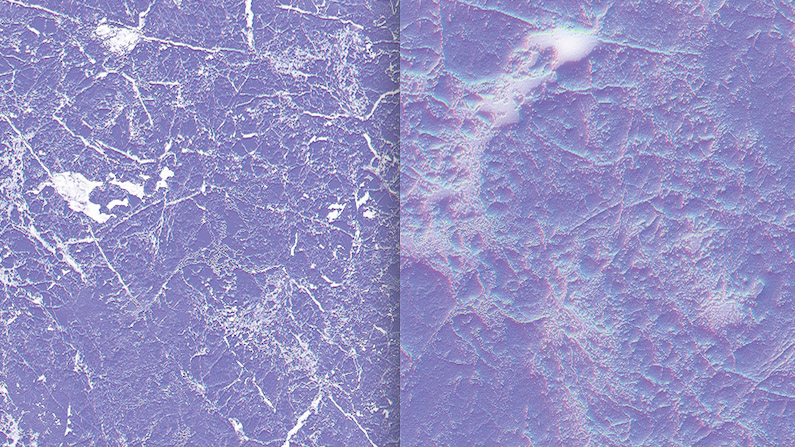
05. Exposed parameters
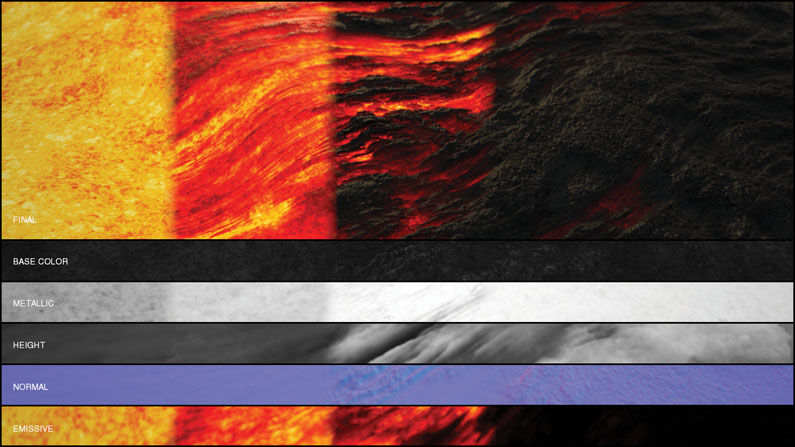
You lot can see the influence of exposed parameters on each output, from hot (left) to the common cold country (correct). Exposed parameters in Designer are the strategic central to a powerful material, permitting Painter and other apps or users to adjust and bring multifariousness with one material.
Technique by Janine Smith
Stylised texture
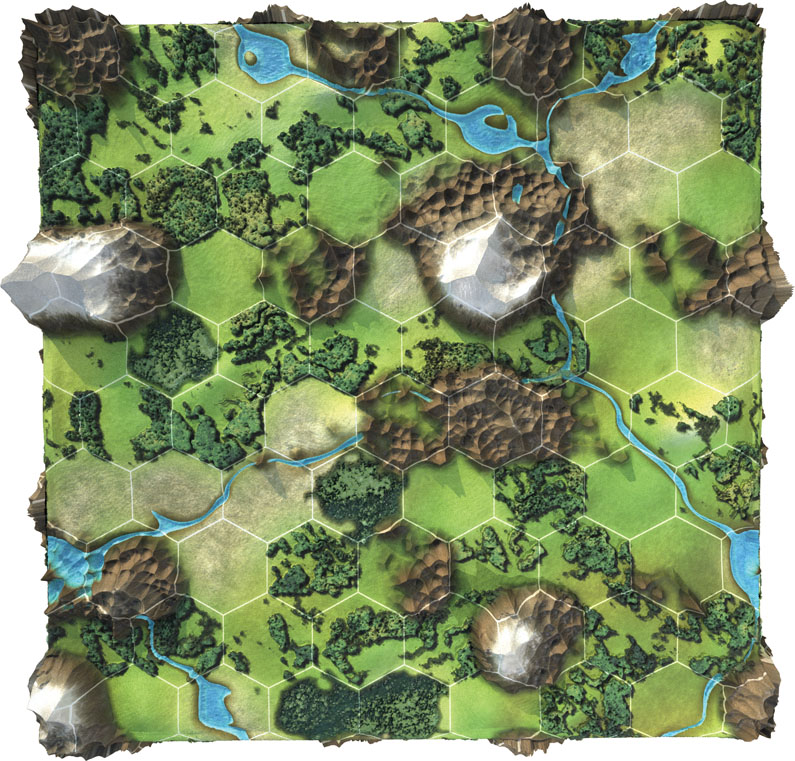
For this material, I really wanted to create something I'd been thinking about for a long time. Substance Designer has a really bang-up workflow and is great for PBR and photorealistic fabric creation, but – encouraged by the Material Contest – I wanted to observe out how well it can handle fully procedural asset generation.
I created a hexagon world map in which every mount, river and wood is placed randomly and independently – in a natural and somewhat believable way. So the consequence is a material that'due south also a random map generator! How cool is that?
The best manner was to generate multiple submaterials for each terrain element (for example forest, grass and river) and layer them together with sensible masking. Using hexagon tiles every bit masks gives the whole material a typical 'game globe map' advent.
The tricky function was to aggrandize and blur the mask so that the mountains and forests don't wait artificially cutting off at the borders. Letting them overlap the borders a flake also adds to the natural await and feel. Mask erosion and the Vector Warp node provided me with the best solution here. So it's just a matter of tweaking and combining the correct noises. For instance, the Gradient (Dynamic) node was used for the forest and the Cell Noise is all-time for cracks, fissures, and apparently, for mountains.
The river was the last tricky part. Breaking it down, it's just sparse, winding lines that join in some places. I used a trick called 'straight skeleton' and used Vector Warp to go far loosely follow the hexagon tile borders.
01. Hexagon Masking
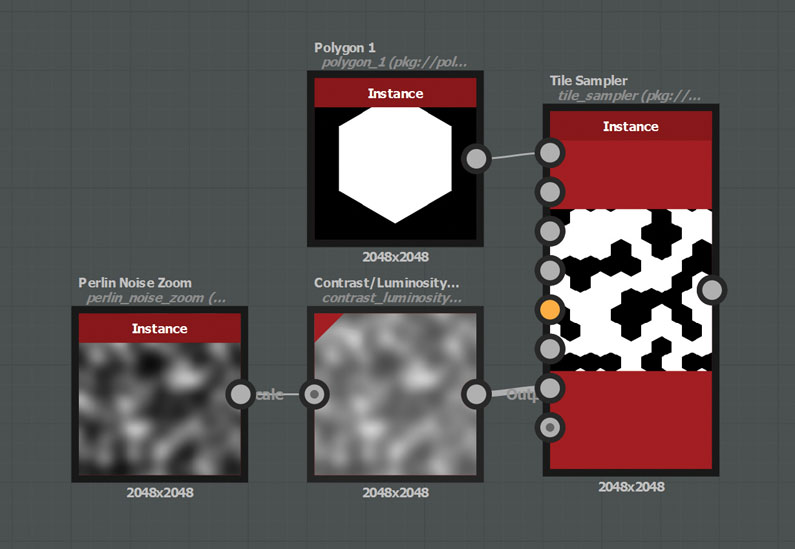
The Tile Sampler is the easiest mode to create hexagon masks. The Noise node determines which tiles are visible. A polish noise gives a more natural feel compared to random placement.
02. Dilation Erosion
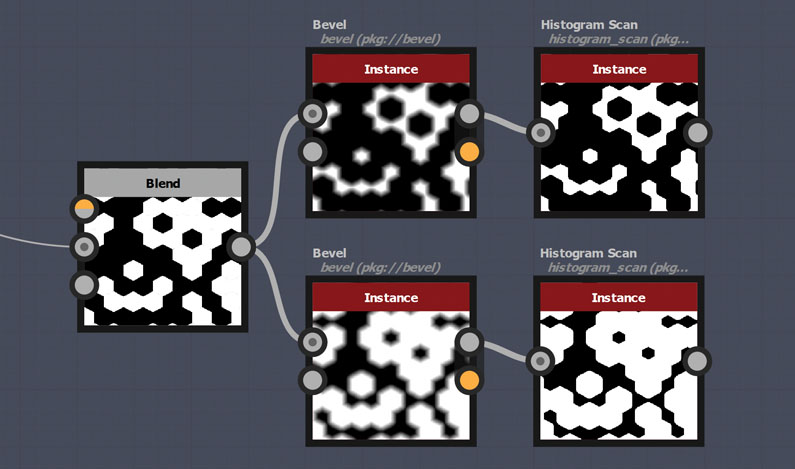
With the Bevel node followed by the Histogram Scan node, you can hands simulate the morphological operations: Dilation and Erosion. This is useful when expanding or shrinking a mask.
03. Vector Warp
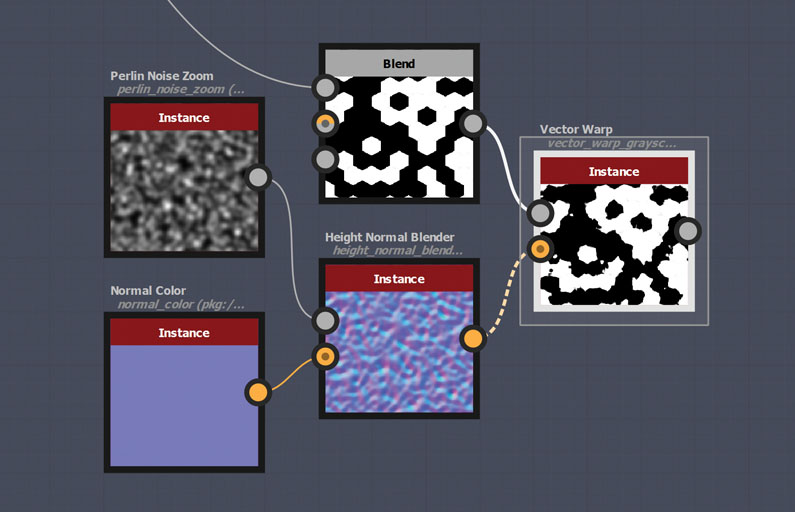
Using the Vector Warp node with racket on a mask is likewise a nice mode to obfuscate the borders.
04. Dynamic Gradient
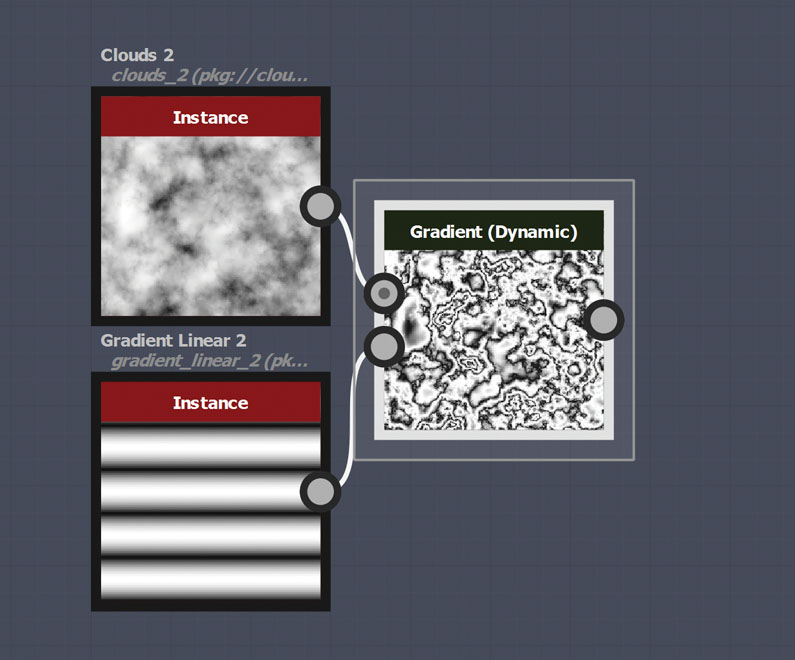
The Gradient (Dynamic) node is very useful when it comes to wood-like textures. It likewise helped me to shape the wood, in what tin can be seen as lines of copse.
05. Border Detect
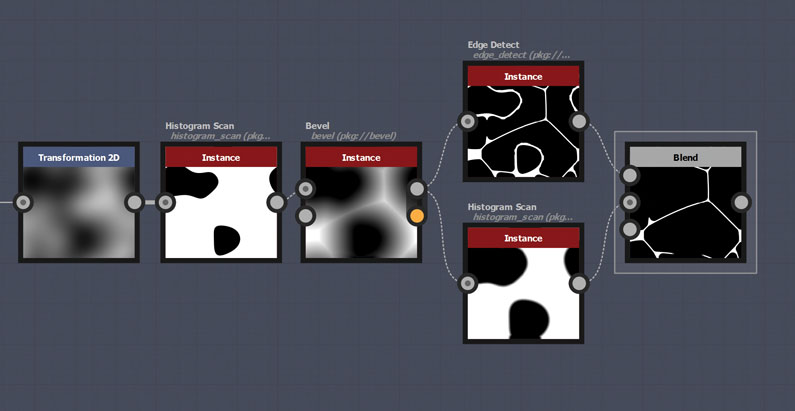
Using a Bevel node with negative distance visualises the straight skeleton of the input mask. By following this with the Edge Detect node and masking the eye, you tin create a mask that looks a scrap similar a river.
06. River Baloney
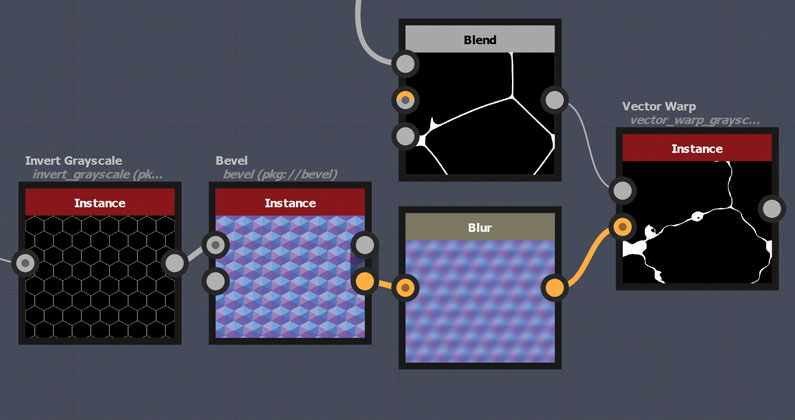
Using the Bevel node with negative distance and plugging the normal output into the Vector Warp node gives the river its last appearance. The river is now loosely following the hexagon borders.
Technique by January Hoppenheit
Fantasy texture
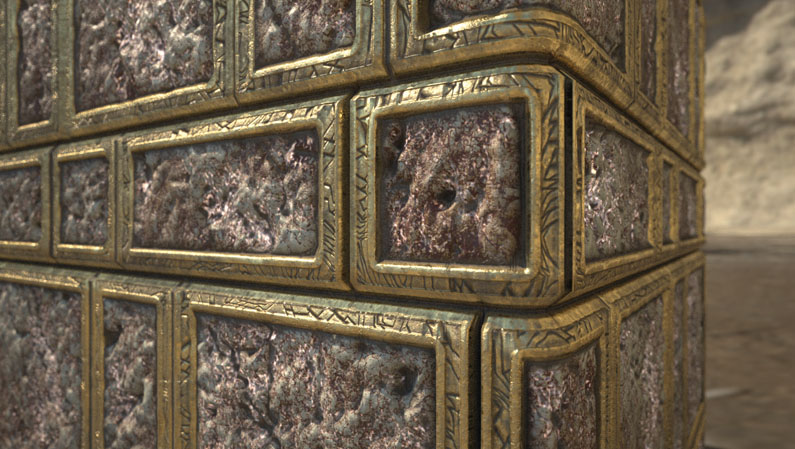
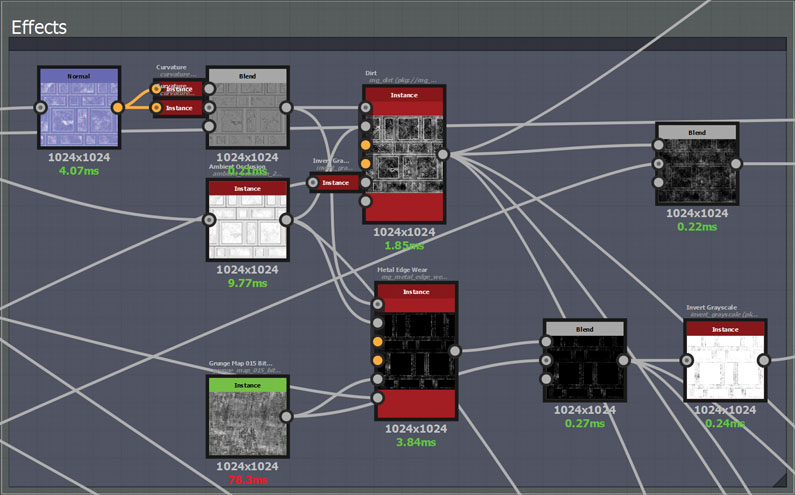
My fantasy entry was inspired by games similar Skyrim. Plumbing equipment in with the Dwarven theme, I figured it would be cool to make stone slabs with a metal frame, with some runes inscribed on the edges. Since these kinds of Dwarven environments are situated underground, I wanted to add some emissive parts to the substance as well – something resembling marble veins.
With that in the back of my heed, I looked through my photo library for reference pictures for the marble/stone. A adept reason for having a solid reference moving-picture show library is that in Substance it's very easy to 'lift' a gradient off parts of an image. That way you lot can make certain you lot have the right colours and colour variations.
I began in Substance Designer by using a Brick Generator for the tile shape and and then using that same node for the rune-like shapes establish on the metallic frames.
01. Create and detail the shapes

To get these shapes I used Directional Warps and offset them using a copy of the same Brick Generator, with the Peak Variation set to Max and the Interstice/Bevels set to 0. This fashion every slab has a different value so the directional offset will break up the pattern differently for each tile.
I usually work from large scale to smaller details, so kickoff with shapes like the frame and stone. I then use noises to refine that, so from upwards close you tin can meet exactly what kind of fabric it is. Cracks, dirt, dents and and so along tell you a lot about what has happened in the world.
To make the Elevation map for the stone, I used a Custom node (dubbed the Refine Noise node). It takes an input, filters it, and then adjusts the levels so there aren't any pure black or pure white patches. Information technology'south on Substance Share for those who want to attempt it.
02. Create article of clothing and tear
For the article of clothing and tear, I used two of my favourite mask generators: the Clay and Metal Border Wear nodes. I made a Normal map based on the Height map and then I could utilise that as an input for two Curvature nodes (Smooth Curvature and Regular Curvature). I blended these so that I would accept some fine details as well equally the hard lines you wait. An Ambient Apoplexy node was based on the same Summit map also.
03. Generate your color
For the rock colour, I utilised a play tricks first used by Substance guru Vincent Gault. I accept four separate colour gradients fed into a Dynamic Gradient node, which has its position slider exposed so the user can cycle through different rock types.
04. Use the colour picker
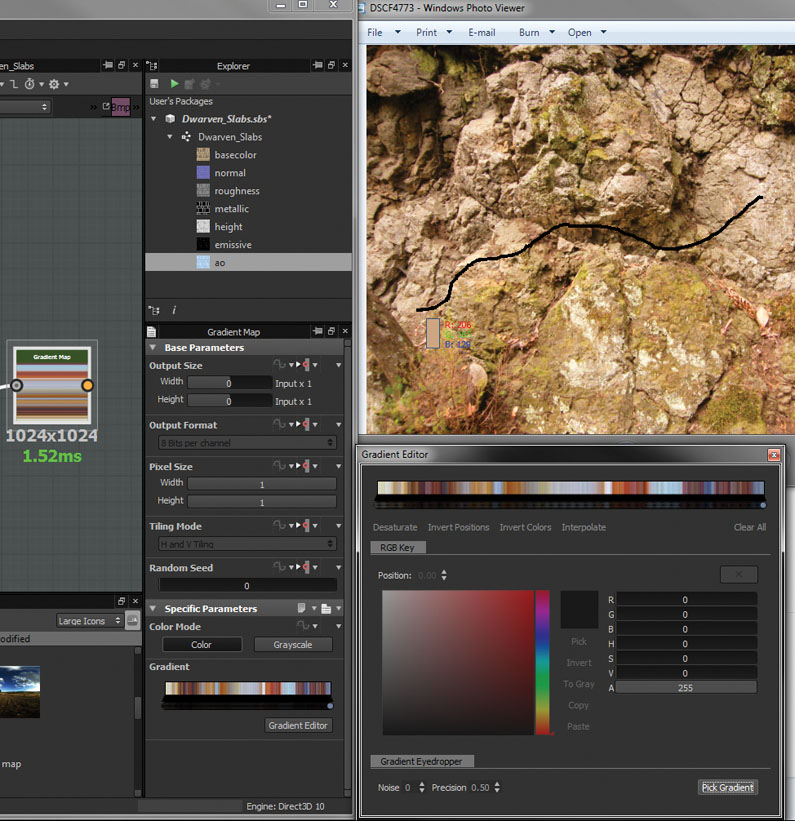
Ane of the features I really love is being able to 'pick' a gradient past dragging the Color Picker beyond an image. You can grab colours correct off the concept art/reference images to make sure avails match the demands of the project you're working on.
05. Emissive elements
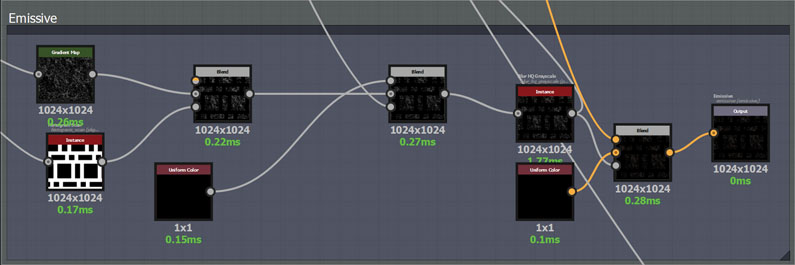
For the emissive parts, I fabricated a gradient based on the stone noise, which but selects certain parts, making it await like veins. And then I masked out the frame and clay, multiplied it with the stone color slope, and plugged it into an emissive output.
06. Bringing it together

Finally, I layered it all together based on the mask for the frame, rock and mask generators. Nail! There y'all have cool fantasy Dwarven stone slabs.
Technique by Käy Vriend
This article was originally published is issue 212 of 3D World mag, purchase it hither
DOWNLOAD HERE
Posted by: soulieresleaspold.blogspot.com

